
TL;DR
Moving your rig into a closet and carefully treating the space can drastically cut noise and reflections. Focus on placement, sealing gaps, and ventilation for the best results—foam alone won’t cut it.
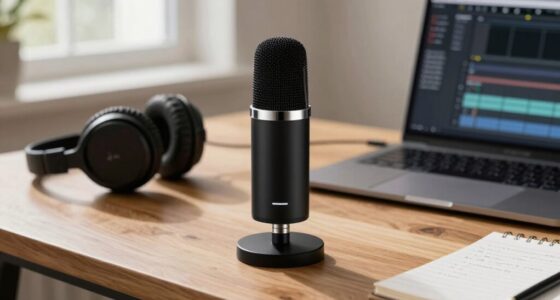
Ever set up your audio gear in a closet only to find it sounds worse than expected? It’s not just you. Many creators discover that small, enclosed spaces amplify echoes, and noise leaks out like a ghostly hum. The good news? With smart placement and the right treatment, you can turn even a tiny closet into a quiet, professional-sounding studio.
This guide reveals the most practical ways to dampen sound, where to put your treatment, and how to keep your rig cool and silent. Ready to make your closet work for you, not against you? Let’s get into it.
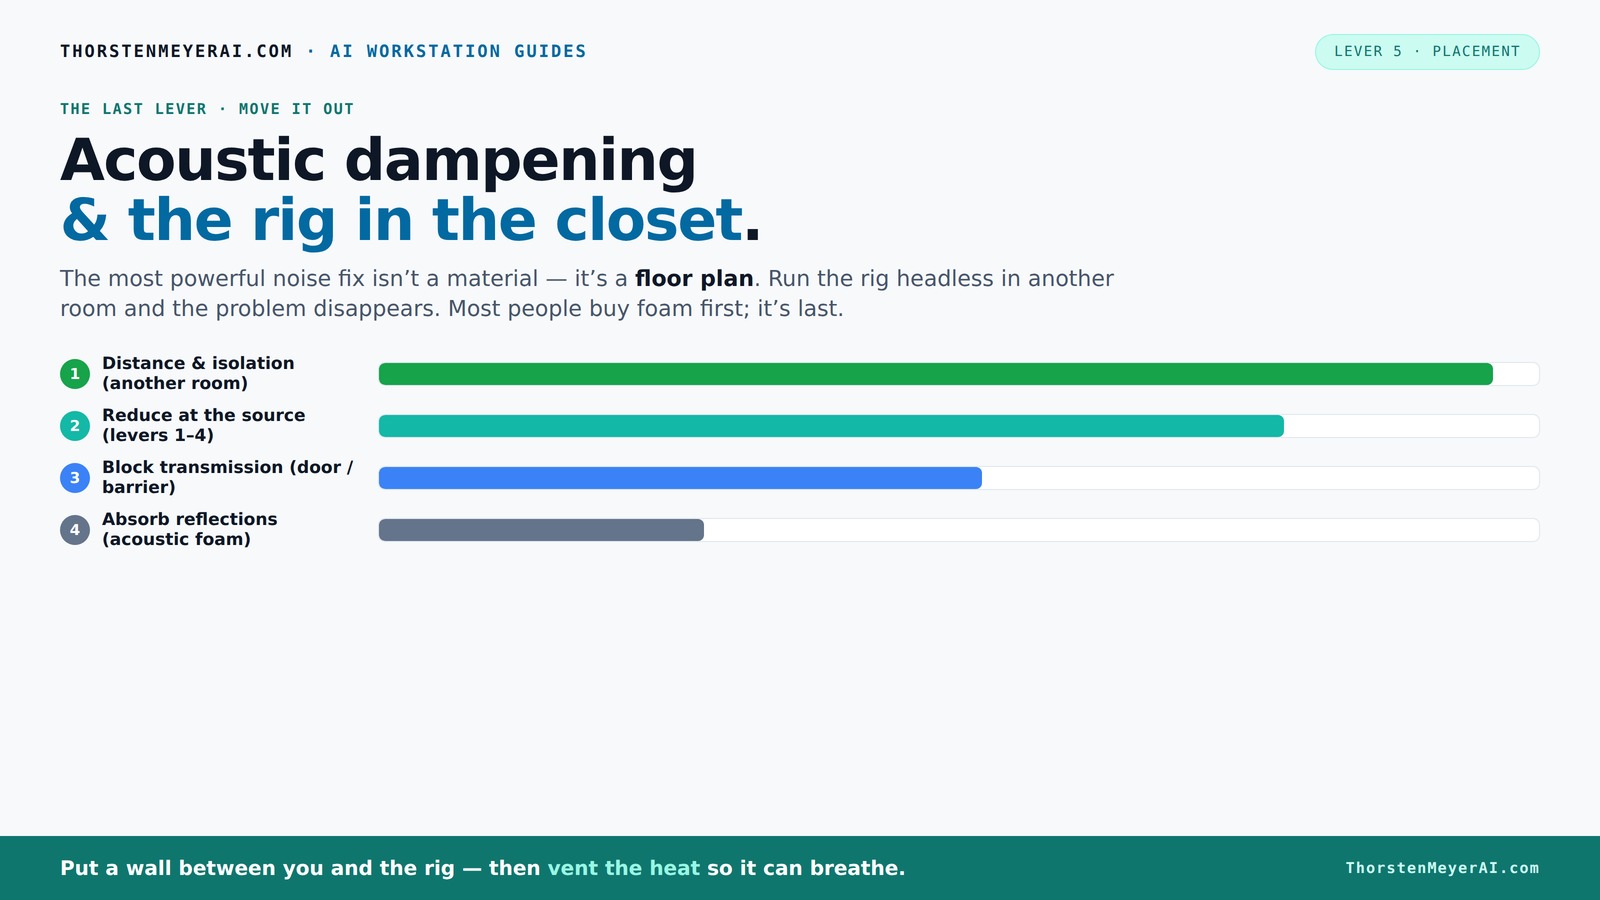
Acoustic dampening
& the rig in the closet.
The most powerful noise fix isn’t a material — it’s a floor plan. A rig you can’t hear because it’s in another room beats any amount of foam. Tap the approaches in Part 1 to see what actually works.
(another room)
(levers 1–4)
(door / barrier)
(acoustic foam)
Contain the noise, not the heat
Key Takeaways
- Moving your rig to another room or closet is the most effective way to eliminate noise.
- Proper ventilation is critical when placing high-heat equipment in enclosed spaces.
- Acoustic dampening reduces echoes but doesn’t block sound leaks; sealing gaps is essential.
- Placement of treatment—reflection points and corners—has a bigger impact than just filling the space with foam.
- DIY, reversible solutions like blankets and command hooks can transform a closet into a flexible studio without damage.

Focusound 52 Pack Acoustic Foam Panels 1" x 12" x 12" Sound Proof Foam Panles Soundproofing Noise Cancelling Wedge Panels for Home Office Recoding Studio with 300PCS Double-Side Adhesive
Soundproofing - Acoustic foam panels triangular grooves structure for better noise absorption, helps to reduce and absorb unwanted...
As an affiliate, we earn on qualifying purchases.
As an affiliate, we earn on qualifying purchases.
Why Moving Your Rig Is the Easiest Way to Silence Noise
Putting your high-power rig in a different room beats any foam or blanket. Distance is the best soundproofing trick. When you relocate your setup to a closet or basement, the noise doesn’t just get muffled—it’s effectively cut off from your workspace.
Imagine your noisy GPU rig in a closet on the other side of the house. You won’t hear a thing, even during intense workloads. All you need is a good network connection and some way to vent the heat. This simple step can save you hundreds on soundproofing materials and frustration. For more tips, see our guide on Acoustic Dampening, Placement, and the "Rig in the Closet" Setup.
For example, a friend of mine moved his AI server into the basement, connected it via Ethernet, and now works in a silent office while the rig roars in the background. That’s the power of distance.
Focusound 52 Pack Acoustic Foam Panels 1" x 12" x 12" Sound Proof Foam Panles Soundproofing Noise Cancelling Wedge Panels for Home Office Recoding Studio with 300PCS Double-Side Adhesive
Soundproofing - Acoustic foam panels triangular grooves structure for better noise absorption, helps to reduce and absorb unwanted...
As an affiliate, we earn on qualifying purchases.
As an affiliate, we earn on qualifying purchases.
The 'Rig in the Closet' Idea — How to Do It Without Cooking Your Hardware
Placing a hot, high-load machine inside a closet sounds perfect for noise reduction—until you realize heat kills electronics. The trick? Ventilation. You need a steady airflow, or your rig will heat up, throttle, and scream louder. The key is to design a ventilation plan that keeps things cool without letting noise escape.
Use passive vents or quiet exhaust fans—think computer case fans or ducted systems. Some DIY setups use an intake vent with a small fan pulling cool air in, and an exhaust vent pushing hot air out. When done right, you get quiet and cool at the same time.
Want a real-world example? One streamer built a custom vented closet with a small exhaust fan and acoustic blankets lining the inside. The result? A silent, cool environment that keeps his GPU happy and his neighbors happy, too. For more on this, see Acoustic Dampening, Placement, and the "Rig in the Closet" Setup.

Audimute Soundproofing Acoustic Door Seal Kit - Door Sweep and Seal - (Large Size)
Includes (2) Door Seals (3/16" x 1/2" x 50') and (1) Door Sweep (1/2" x 1.5" x 25').
As an affiliate, we earn on qualifying purchases.
As an affiliate, we earn on qualifying purchases.
Acoustic Dampening vs. Soundproofing: What Really Works in a Closet
Many think foam panels automatically block sound. Not quite. Acoustic dampening reduces echoes and reflections inside the space, making your recordings clearer. Soundproofing, on the other hand, blocks sound from leaking out or coming in.
In a closet, you want a mix of both—foam to tame reflections, seals for leaks, and dense barriers for isolation. Foam like 2-inch panels absorb mid and high frequencies well, but low-end sounds need bass traps and broader coverage. Sealing cracks around the door with weatherstripping or acoustic sealant prevents leaks.
Understanding the difference is crucial because improper application leads to wasted effort. For instance, adding foam without sealing gaps can trap sound inside, making reflections worse rather than better. Conversely, sealing leaks without proper absorption inside the room leaves echoes and muddiness. To learn more about effective soundproofing, visit Acoustic Dampening, Placement, and the "Rig in the Closet" Setup.

TroyStudio Portable Vocal Booth, Large Foldable Microphone Isolation Shield, Music Recording Studio Sound Echo Absorbing Box, Desk & Stand Use Reflection Filter with Thickened Dense Acoustic Foam
【BASIC INFO】: Inside size after setup: 8'' (L) X 10'' (W) X 12'' (H), large space for various...
As an affiliate, we earn on qualifying purchases.
As an affiliate, we earn on qualifying purchases.
Placement Tips: Where to Put Treatment in a Small Closet
Effective placement is everything. Start with the reflection points: the wall directly behind your mic, the ceiling above, and the walls adjacent to your setup. Covering these spots reduces early reflections that color your sound. For detailed tips, see Acoustic Dampening, Placement, and the "Rig in the Closet" Setup.
Use a mirror to find reflection points—anywhere you see the mic’s reflection in the mirror is a prime spot for treatment. For low frequencies, corners are your best friends—install bass traps in the corners to tame standing waves and low-end boom.
A simple trick: place a thick rug on the floor and hang blankets or foam on the door. Overlap treatment at reflective surfaces and seal gaps around the door to prevent sound leaks. A DIY example shows using curtain rods and thumbtacks to hang foam and blankets effectively without permanent modifications.
Choosing the right placement maximizes the efficiency of your treatment. For example, placing foam only on the ceiling or walls without addressing reflection points can result in uneven sound quality. Similarly, neglecting corners means missing out on reducing low-end muddiness. Proper placement ensures that your efforts are focused where they matter most, leading to clearer recordings and more accurate monitoring.
How to Deal with Parallel Walls and Standing Waves in Tiny Spaces
Parallel walls create standing waves—those pesky low-frequency booms that make your recordings muddy. In a closet, this is common. The fix? Break the parallelity with diffusers or bass traps placed strategically in the corners.
One effective method is to place bass traps in all corners to absorb low frequencies and prevent buildup. Adding some asymmetric treatment on walls—like putting shelves or irregularly shaped panels—disrupts the standing wave pattern, smoothing out the sound. For more strategies, check out Acoustic Dampening, Placement, and the "Rig in the Closet" Setup.
Understanding this is vital because standing waves can cause uneven frequency response, making some notes sound boomy while others are dull. This imbalance affects your ability to judge mixes accurately. Strategically placing bass traps and irregular panels helps prevent these issues, leading to a more balanced and natural sound. The tradeoff is that more treatment can mean more expense and space usage, but the payoff is a significant improvement in clarity and mix translation.
Making Your Closet Reversible—For Renters and Flexibility
Worried about permanent modifications? No need. Many DIY treatments are reversible. Use removable hooks, tension rods, and adhesive-backed foam or blankets. You can transform your closet into a studio without damaging walls or doors.
For example, hanging foam panels with command strips or using tension-mounted curtain rods allows you to remove everything later. Overlap blankets over the door and use draft stoppers or weatherstripping to seal gaps temporarily.
This flexibility means you can adapt your setup as needed—whether for a quick recording session or a permanent solution. It also preserves your rental agreement or keeps your closet functional for daily use. The key is to choose solutions that are non-invasive yet effective, balancing sound treatment with ease of removal. This way, you get a professional-sounding space without sacrificing your ability to revert to a normal closet or avoid damage charges.
Budget DIY vs. Serious Sound Isolation: What’s Worth It?
On a tight budget? Use thick blankets, rugs, and DIY foam panels made from cheap acoustic foam or even egg cartons. These can improve sound quality without big expenses. For better isolation, consider adding mass loaded vinyl or building a sealed cabinet with insulation and ducted venting.
Serious setups involve custom soundproof enclosures, professional bass traps, and active ventilation systems. They cost more but drastically reduce noise transmission and maintain optimal temperatures. The tradeoff is between affordability and effectiveness—DIY solutions are quick and inexpensive but less effective at isolating low frequencies, while professional builds require significant investment but can achieve near-total soundproofing and thermal control.
For example, a hobbyist built a closet booth using moving blankets and foam, reducing noise bleed by 40 dB. Meanwhile, a professional studio might spend thousands on engineered soundproof rooms with HVAC systems. The choice depends on your needs, budget, and whether noise leakage or heat management is your primary concern.
Avoid These Common Mistakes When Soundproofing Your Closet
Overusing foam panels without sealing gaps can just make your room sound worse—like trapping echoes inside. Ignoring leaks around the door or vent openings lets sound escape or enter. And placing treatment before deciding mic placement can lead to ineffective results.
Another mistake? Relying solely on foam for low-frequency control. Without bass traps, the room can still sound boomy. And don't forget: ventilation is crucial. A sealed closet traps heat and can fry your gear.
Pro tip: always seal leaks first, then add targeted absorption at reflection points, and use bass traps for the low-end. Think of your space as a puzzle—every piece matters. Neglecting any aspect can compromise your entire setup’s effectiveness, leading to wasted effort and subpar sound quality. Proper planning and understanding the function of each treatment component help you avoid costly mistakes and achieve better results.
Final Tips: Make Your Closet a Quiet, Functional Studio
Start with the basics: seal the door gaps, add foam at reflection points, and place bass traps in corners. Keep the space well-ventilated with quiet fans or ducting. Use a mic placement that minimizes reflections—keep it close and off-axis.
Remember, the goal isn't perfect soundproofing—it's reducing enough noise and reflections to make recording or streaming clear and comfortable. Small changes add up: a thick rug, hanging blankets, strategic foam placement—all help.
With a bit of effort, your closet can become a surprisingly effective micro-studio. Just don’t forget: the best noise reduction often comes from where you don’t put your rig—in another room.
Conclusion
Quiet, professional-sounding recordings start with smart placement and targeted treatment—moving your rig away from your workspace is often the most effective step. When you combine ventilation, sealing gaps, and strategic absorption, a closet can become a surprisingly capable studio—without breaking the bank.
Remember, soundproofing is about reducing what you hear and what leaks out. Focus on effective placement and sealing, and your closet will serve you far better than noise-canceling gadgets alone. The quietest rooms aren’t the ones with the most foam—they’re the ones where noise simply isn’t there.